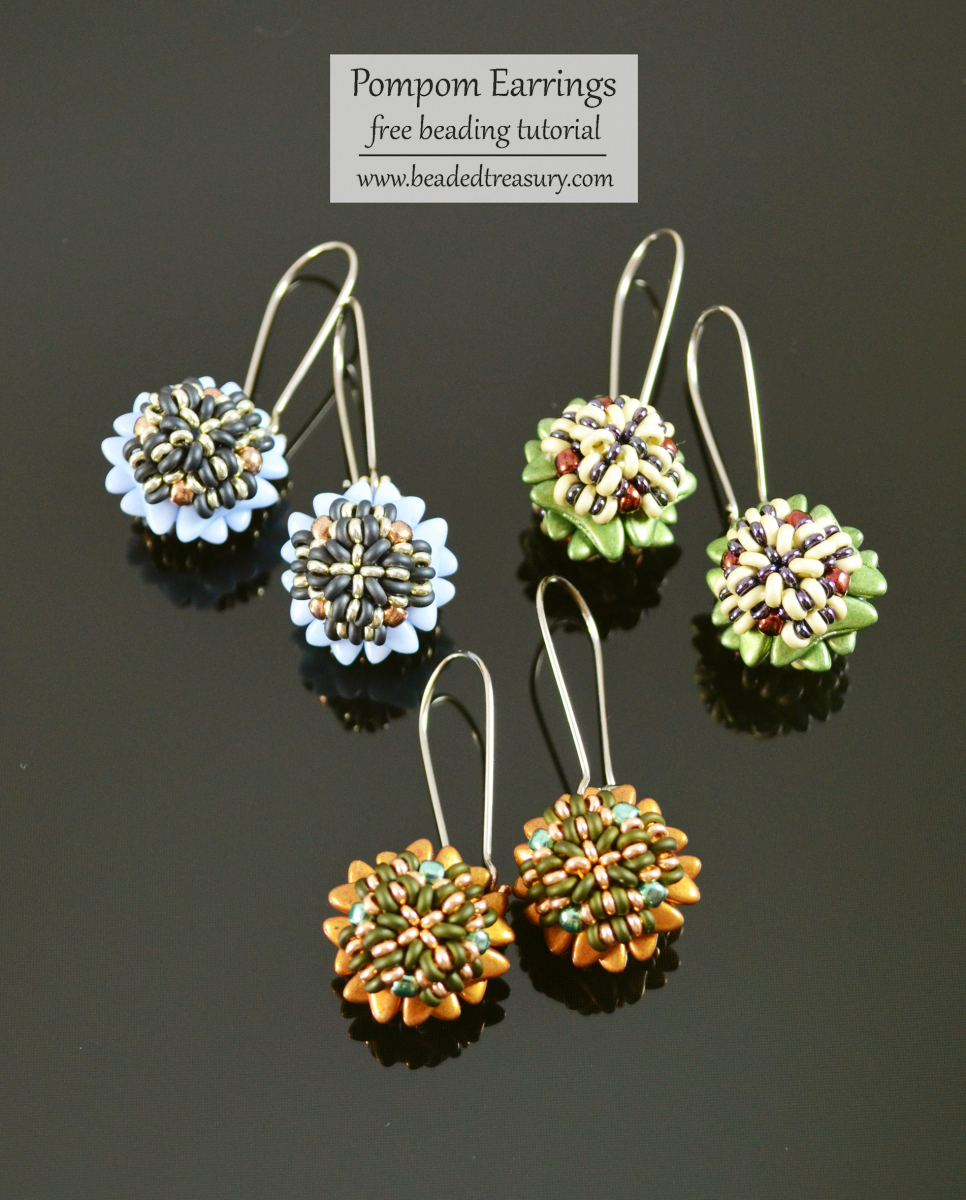
Pompom Earrings
Free Beading Tutorial
This beading pattern was first published in Bead&Button Magazine, August Issue 2019. Now it is available as free tutorial on my website.
An original BeadedTreasury Design (© 2018 Iulia Postica. All rights reserved). This pattern is for personal use and small group teaching. It cannot be sold, republished (online and off-line), redistributed, translated without permission, or edited in any way – in part or in whole. Please always credit me as a designer. Thank you!
********************
Techniques
Bead weaving
Project Level
Advanced beginner to Intermediate
Materials (see bellow for Finished Size)
Blue variation
16 opaque airy blue 3x10mm CzechMates Crescent beads
16 permanent finish galvanized almond size 8/0 Japanese seed beads (Toho PF593)
1.2 gr. matte opaque gray size 8/0 Demi Round beads (Toho 611)
0.6 gr. permanent finish galvanized aluminum size 11/0 Demi Round beads (Toho PF558)
One pair silver 22mm kidney ear wires
One G thread, gray
Gold variation
16 saturated metallic flame 3x10mm CzechMates Crescent beads
16 permanent finish galvanized jade green size 8/0 Japanese seed beads (Toho PF589)
1.2 gr. matte dark olive size 8/0 Demi Round beads (Toho 617)
0.6 gr. permanent finish galvanized rose gold size 11/0 Demi Round beads (Toho PF551)
One pair silver 22mm kidney ear wires
One G thread, orange
Green variation
16 metallic sage 3x10mm CzechMates Crescent beads
16 dark bronze size 8/0 Japanese seed beads (Toho 222)
1.2 gr. permanent finish matte galvanized aluminum size 8/0 Demi Round beads (Toho PF 558F)
0.6 gr. metallic amethyst gun metal size 11/0 Demi Round beads (Toho 90)
One pair silver 22mm kidney ear wires
One G thread, light beige
Tools
Size 11 beading needle
Scissors
Finished Size
Diameter – 1.8 cm (0.7 inches)
Width – 1.5 cm (0.6 inches)
********************
INSTRUCTION
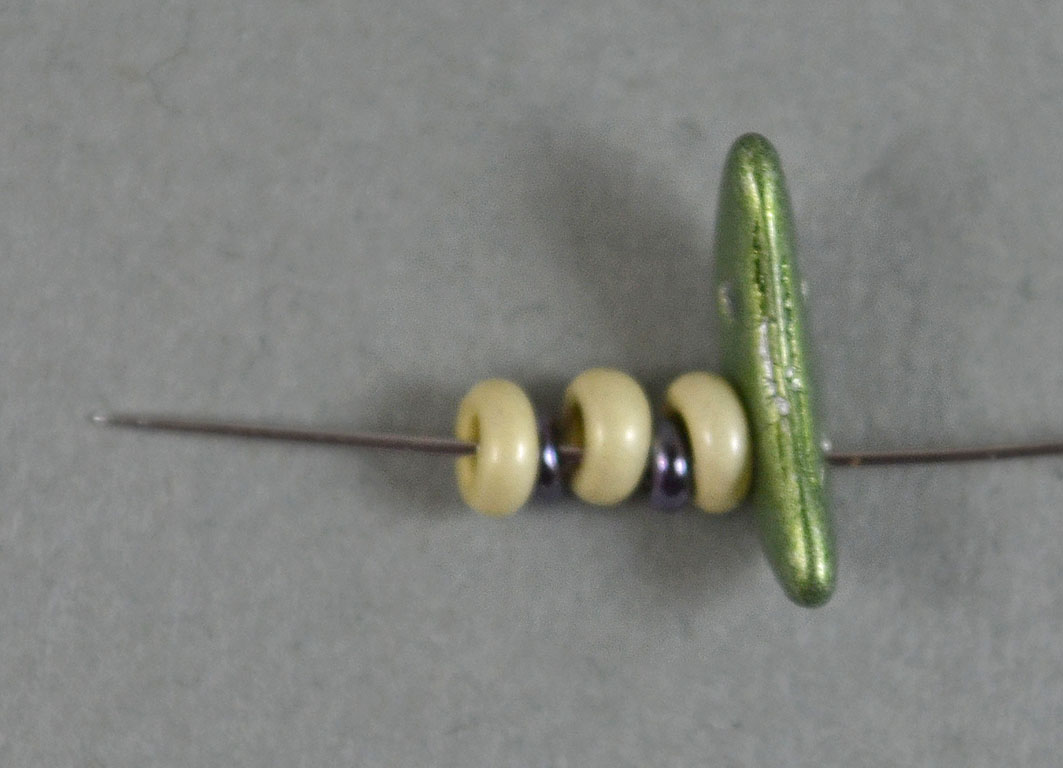
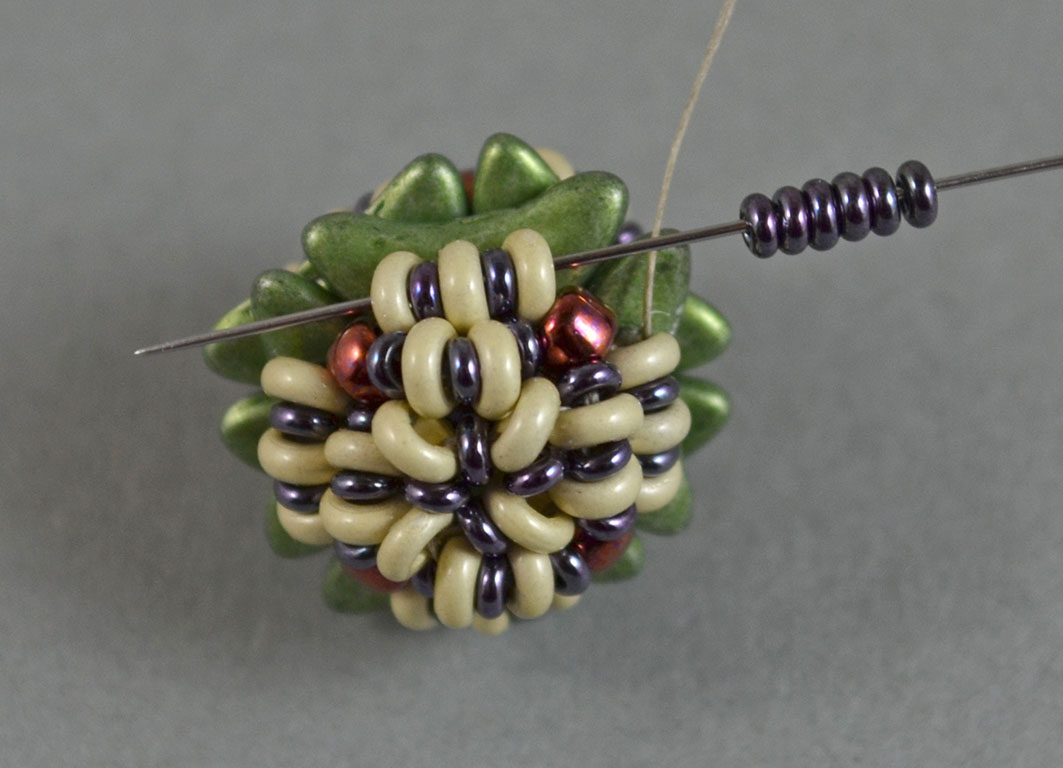
Step 1. Making the Crescent frame.
Cut about 1 m (40 inches) of thread and thread the needle. Pick one 8/0 Demi Round bead, one 11/0 Demi Round bead, one 8/0 Demi Round bead, one 11/0 Demi Round bead, one 8/0 Demi Round bead, one Crescent bead. Slide them down the thread leaving a 10 cm (4 inches) tail.
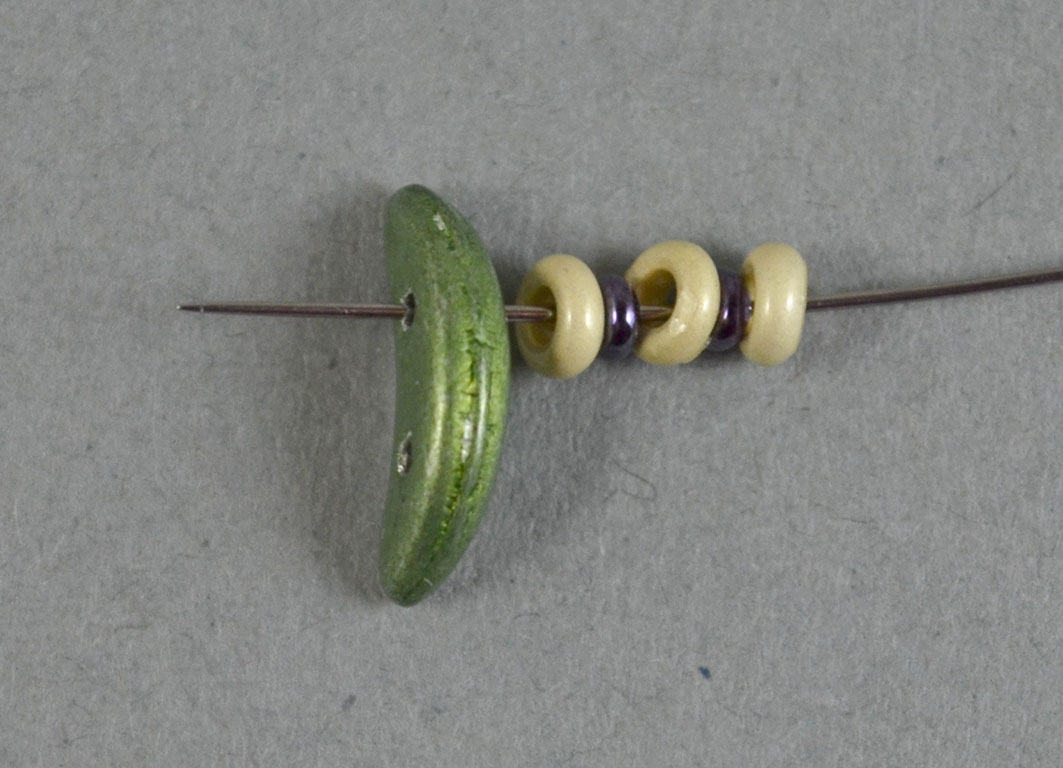
Go back through the second hole of the Crescent bead.

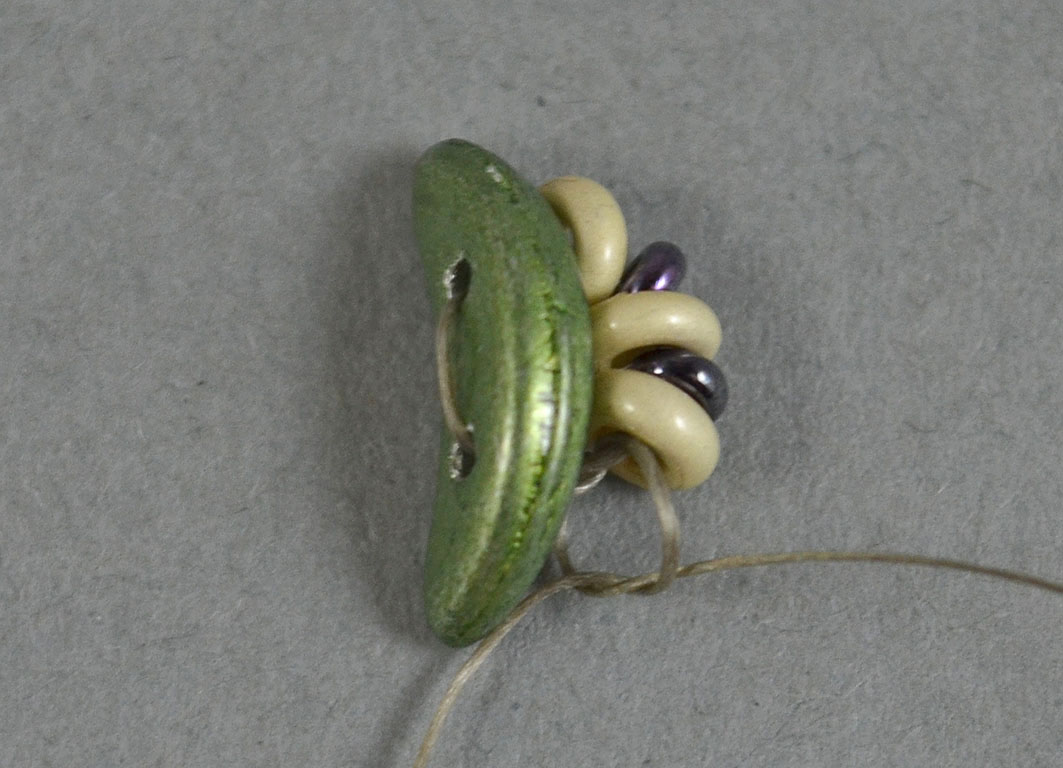
Step 2.
Tie the two threads with two square knots.
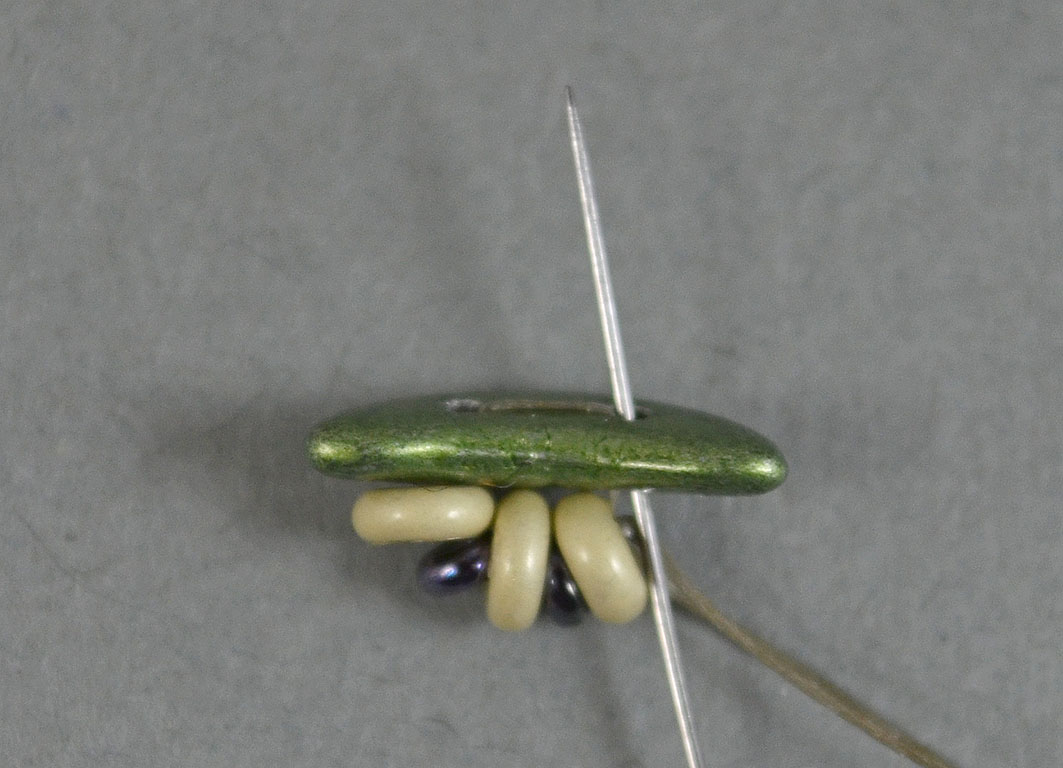
Step 3.
Take the needle up through the Crescent bead.
Step 4.
Pick one Crescent bead, one 8/0 Demi Round bead, one 11/0 Demi Round bead, one 8/0 Demi Round bead, one 11/0 Demi Round bead, one 8/0 Demi around bead and slide the beads down the thread.
Take the needle through the second hole of the last added Crescent bead. Pull the thread tight.
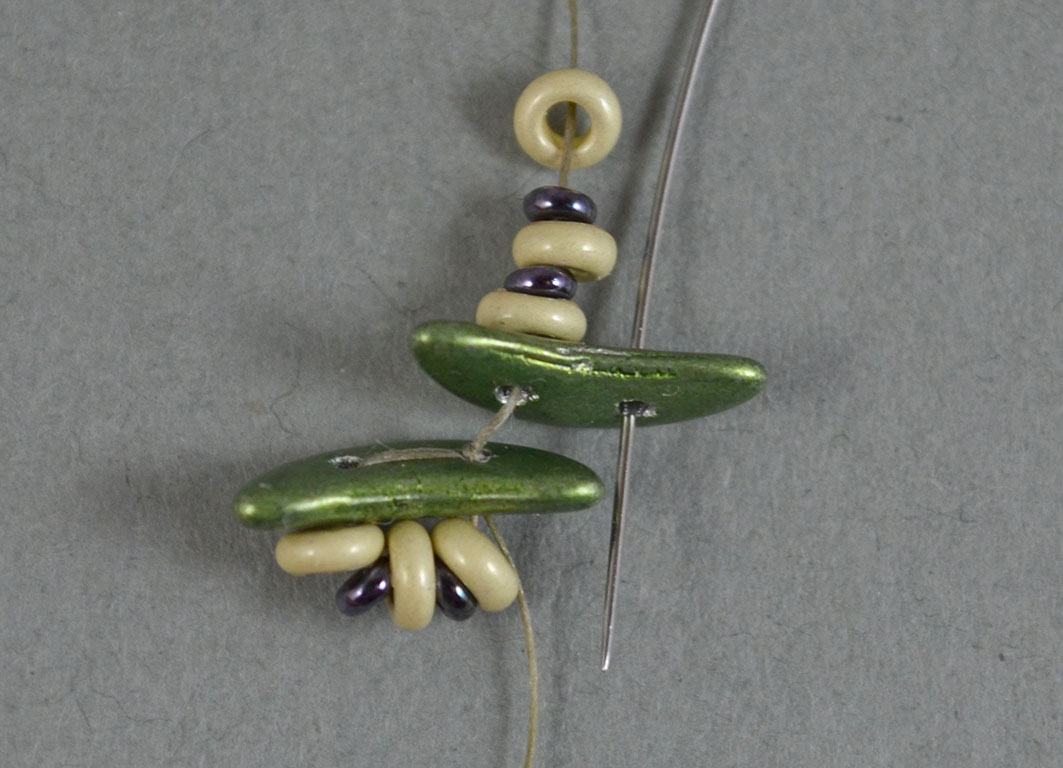
Step 5.
Pick one Crescent bead, one 8/0 Demi Round bead, one 11/0 Demi Round bead, one 8/0 Demi Round bead, one 11/0 Demi Round bead, one 8/0 Demi around bead and slide the beads down the thread.

Go back with the needle through the second hole of the last added Crescent bead. Pull the thread tight.
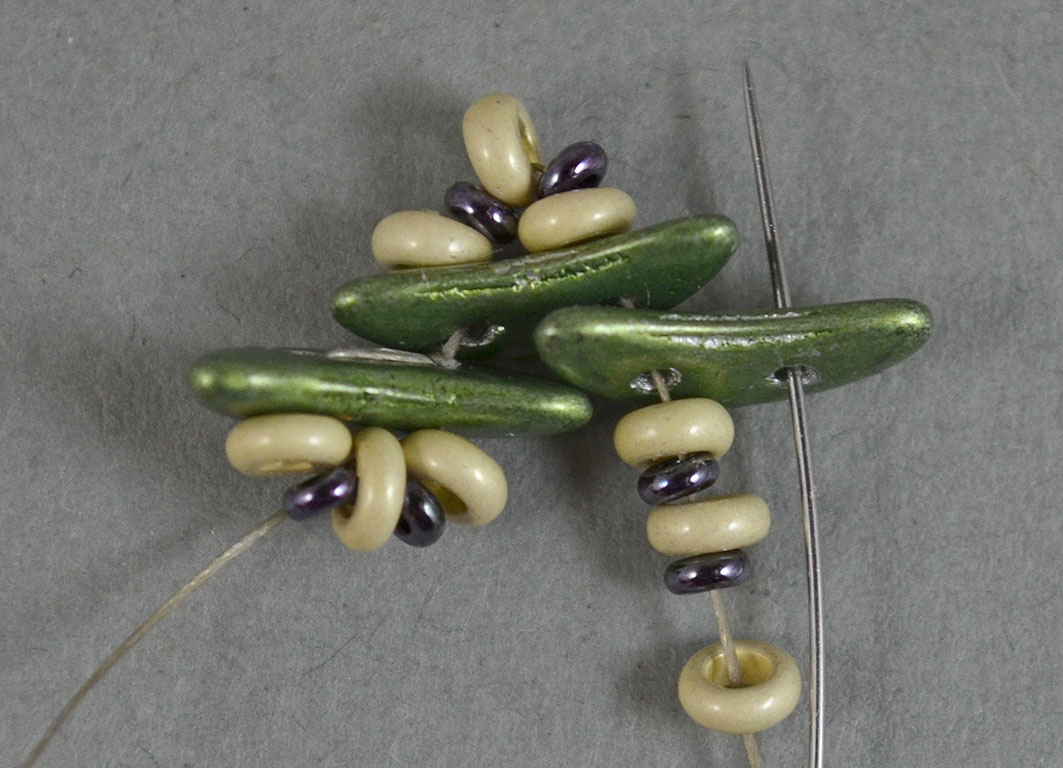
Step 6.
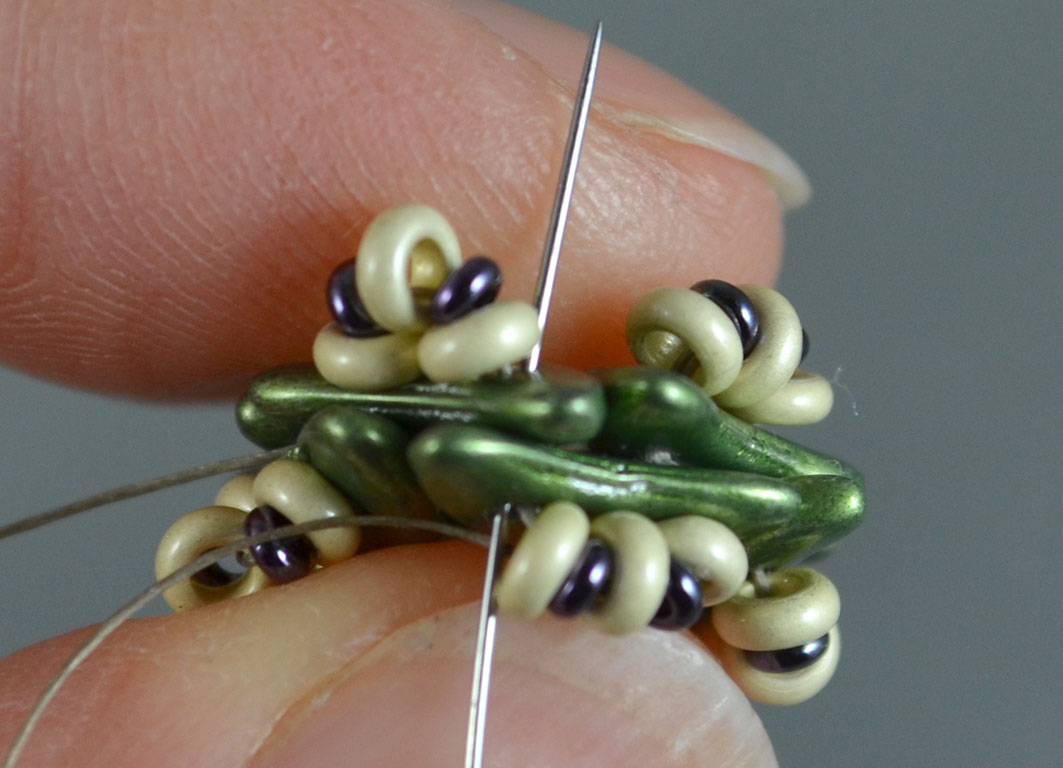
Repeat Step 4 and Step 5 two more times, and then one more time Step 4.
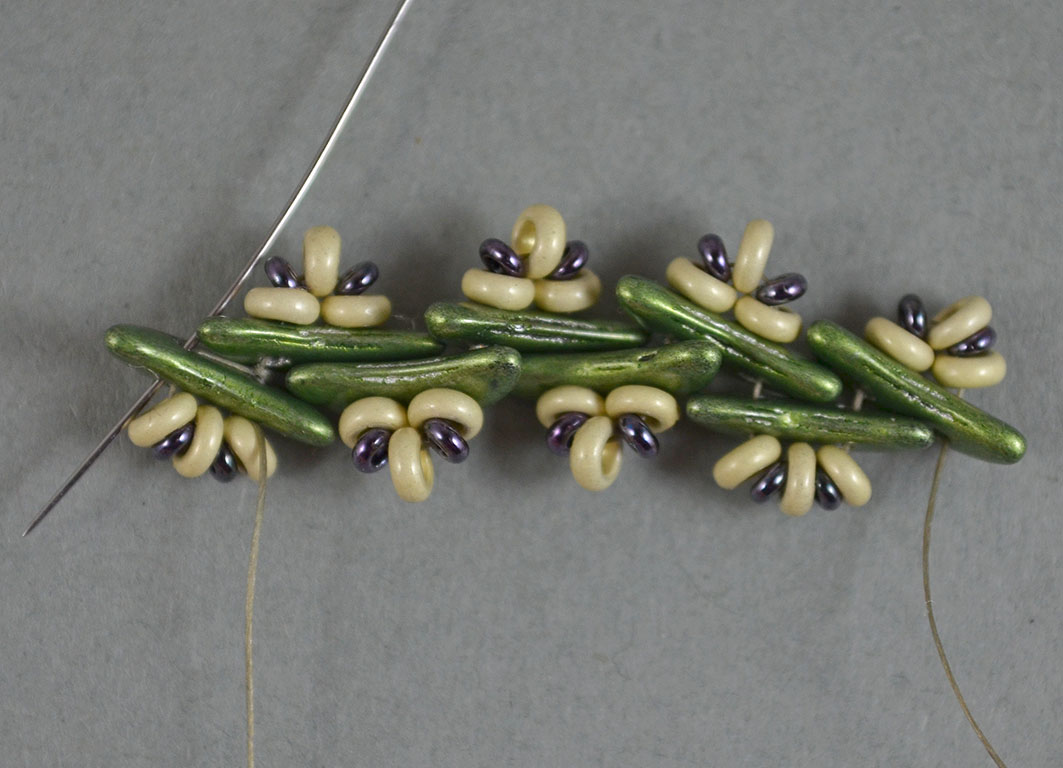
Step 7.
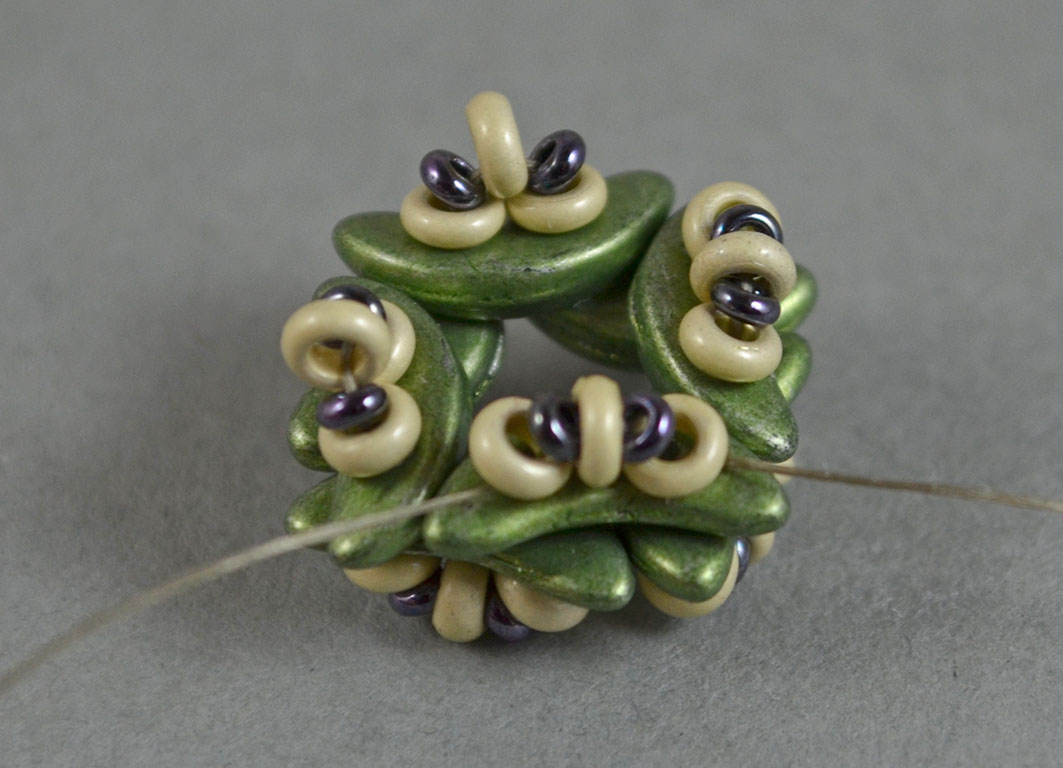
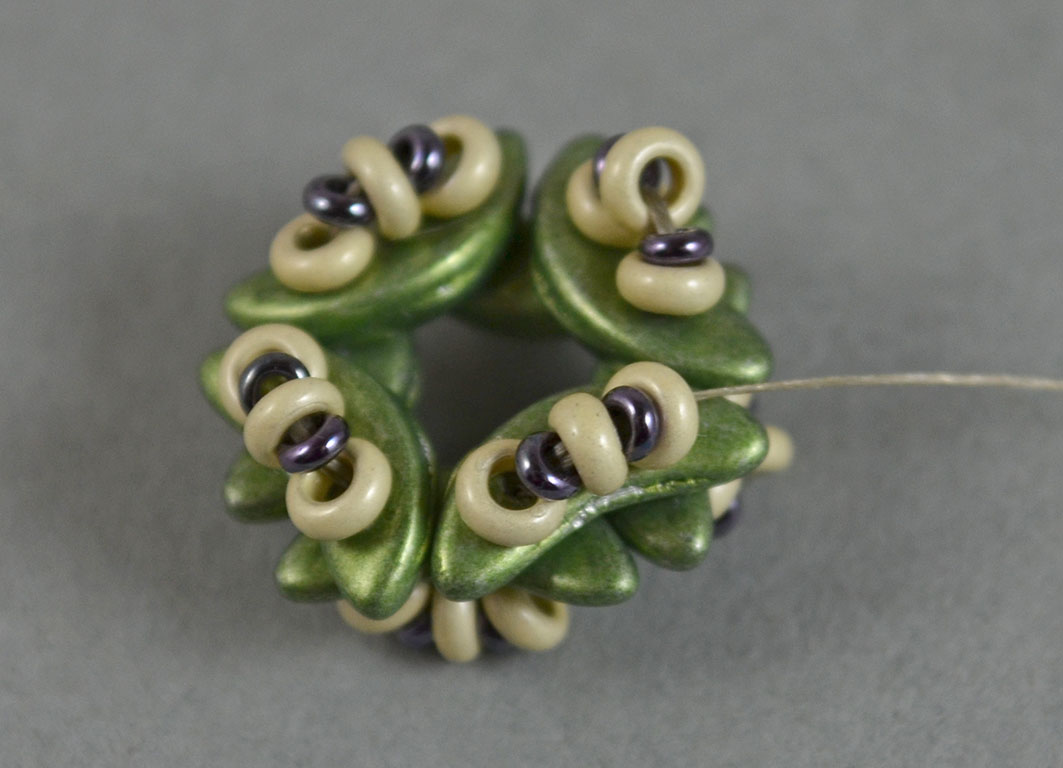
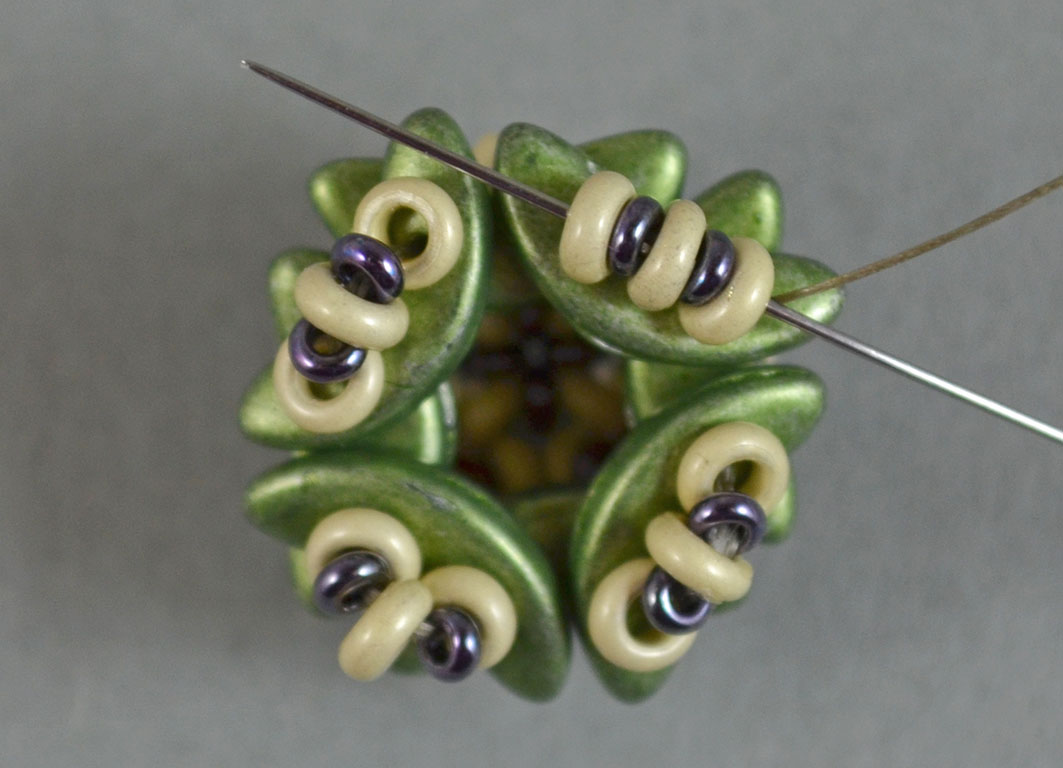
Go with the needle through the outer hole of the first added Crescent bead. Pull the thread and fold the beadwork to form a square with the cut side of the Crescent beads around the outer edge.

You should get this frame.

Side view of the beaded frame. The working thread is the one on the right.
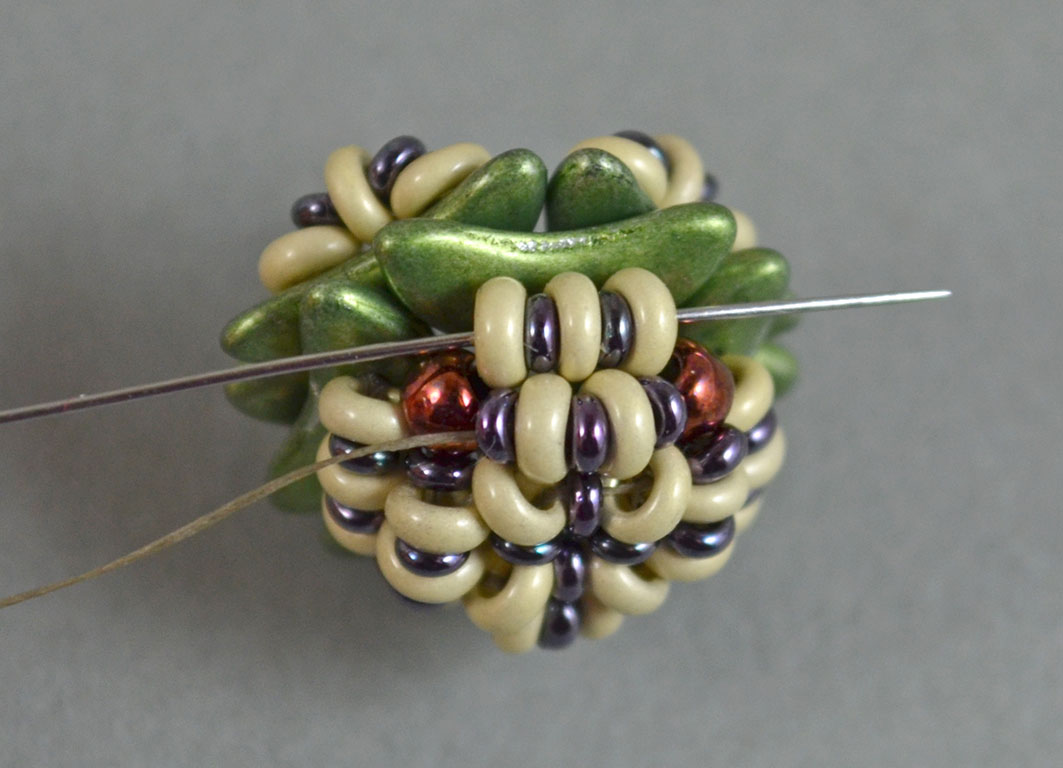
Step 8. Strengthen the frame.
Go with the needle through the next five Demi Round beads.
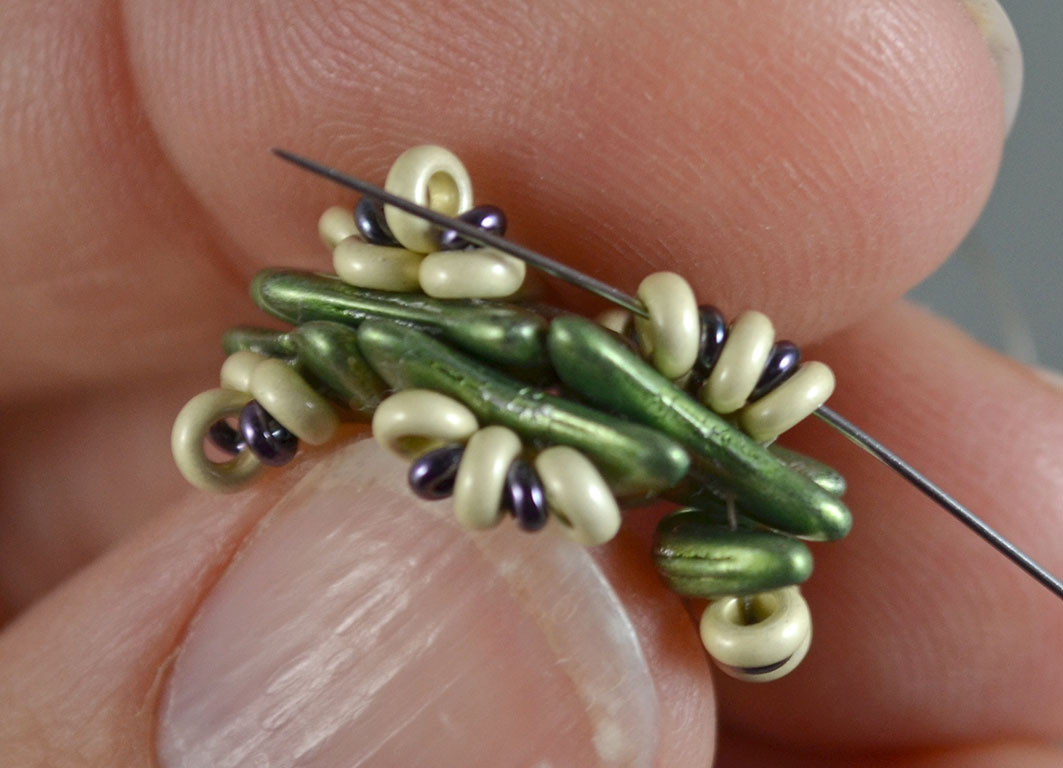
Go with the needle down through the two Crescent beads.
Go with the needle through the next five Demi Round beads.
Go with the needle up through the two Crescent beads.
Repeat all the directions from this step three more times. Always pull the thread tight. In the end, the thread should be exiting from the group of five Demi Round beads.
Also hide the thread end left in the beginning of the work.
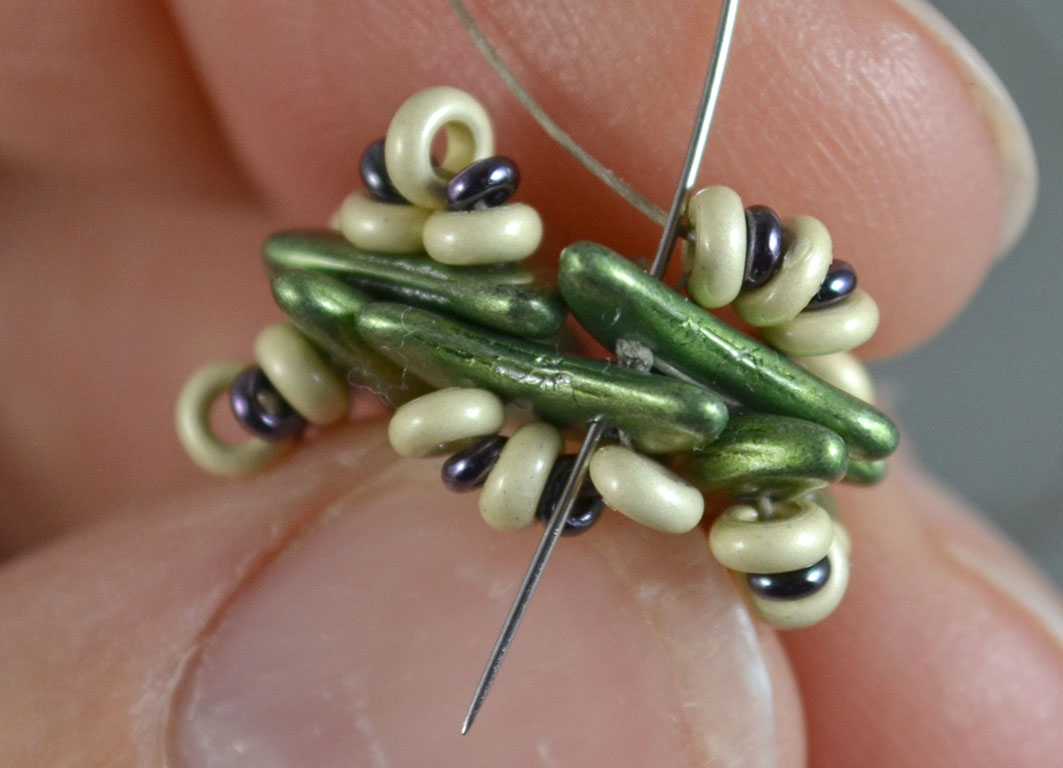
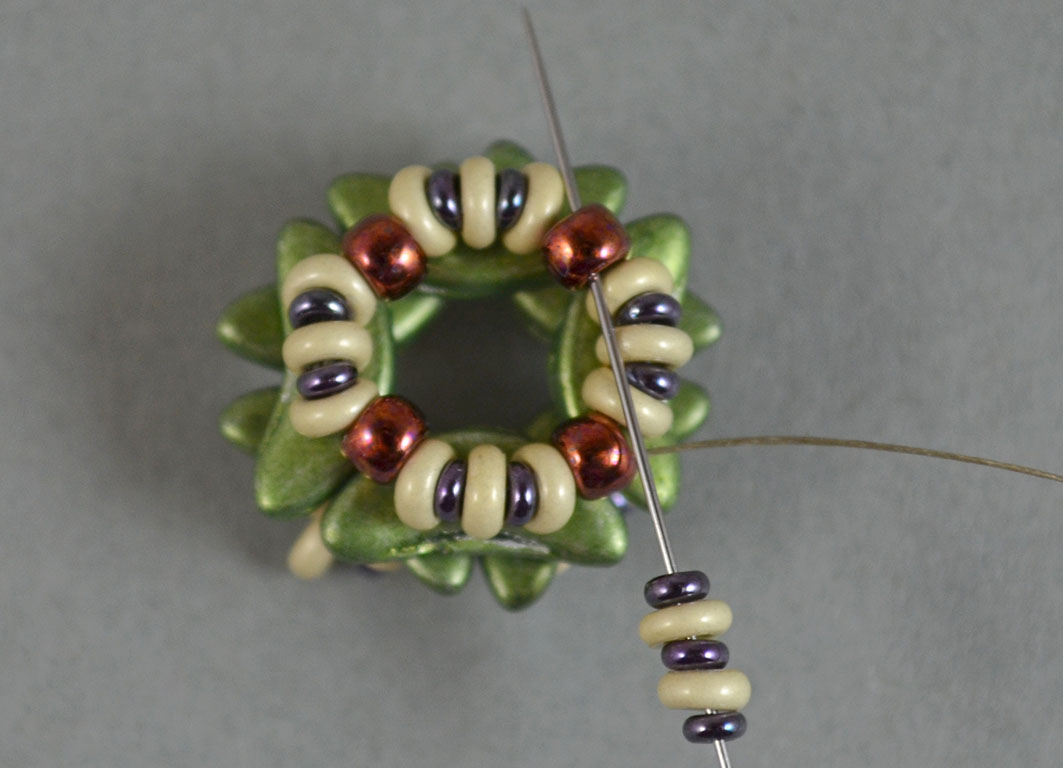
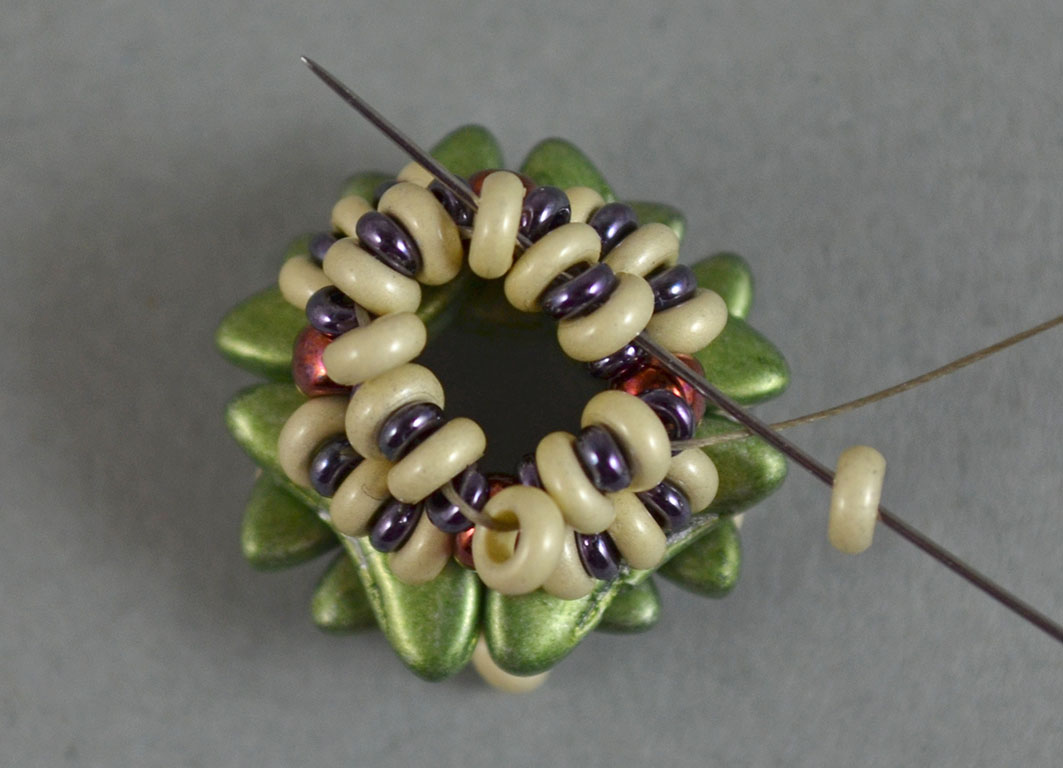
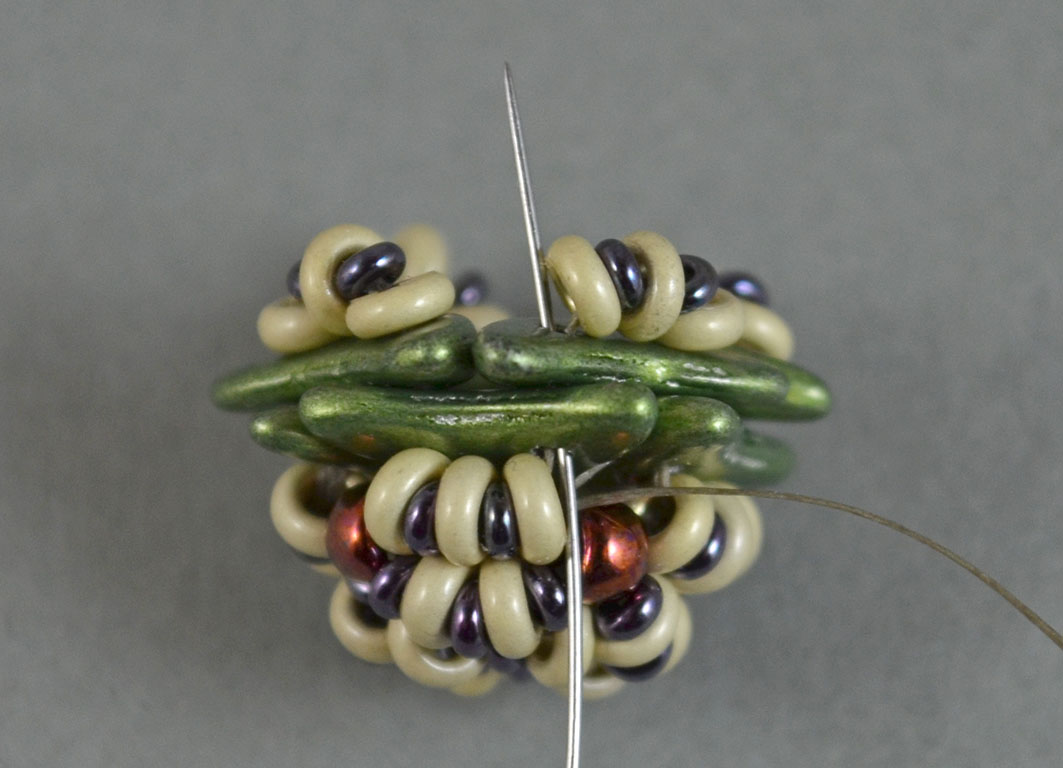
Step 9.
Pick one 8/0 seed bead and go through the next group of five Demi Round beads.
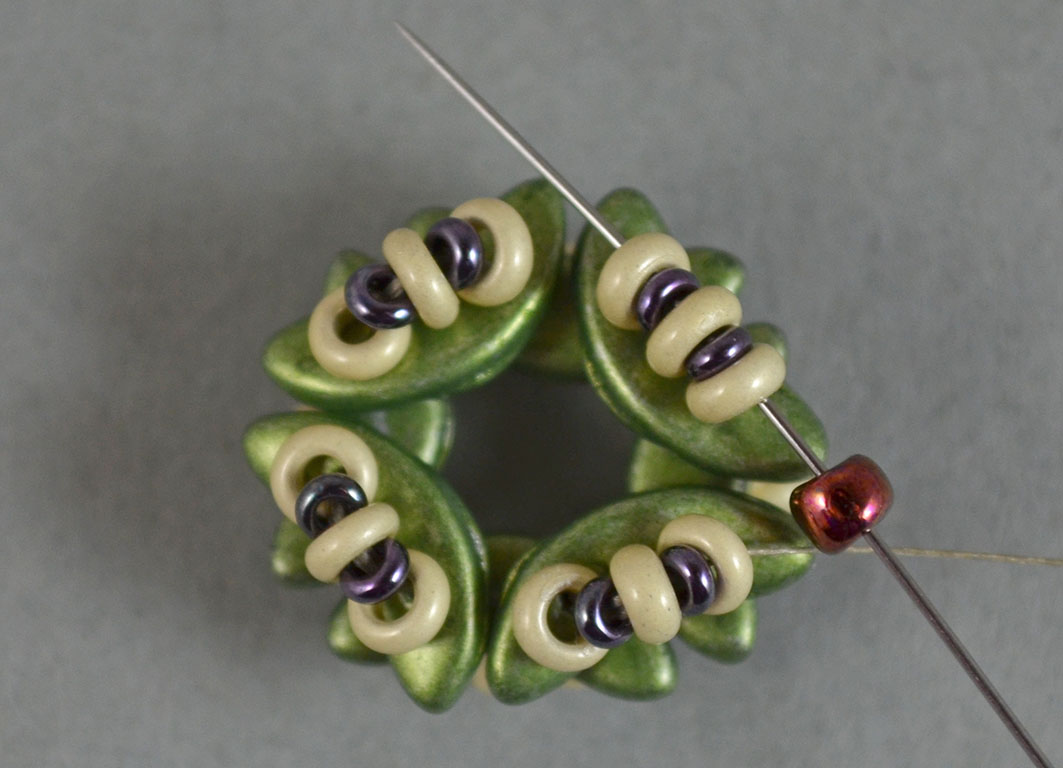
Add three more 8/0 seed beads as explained above in this step.
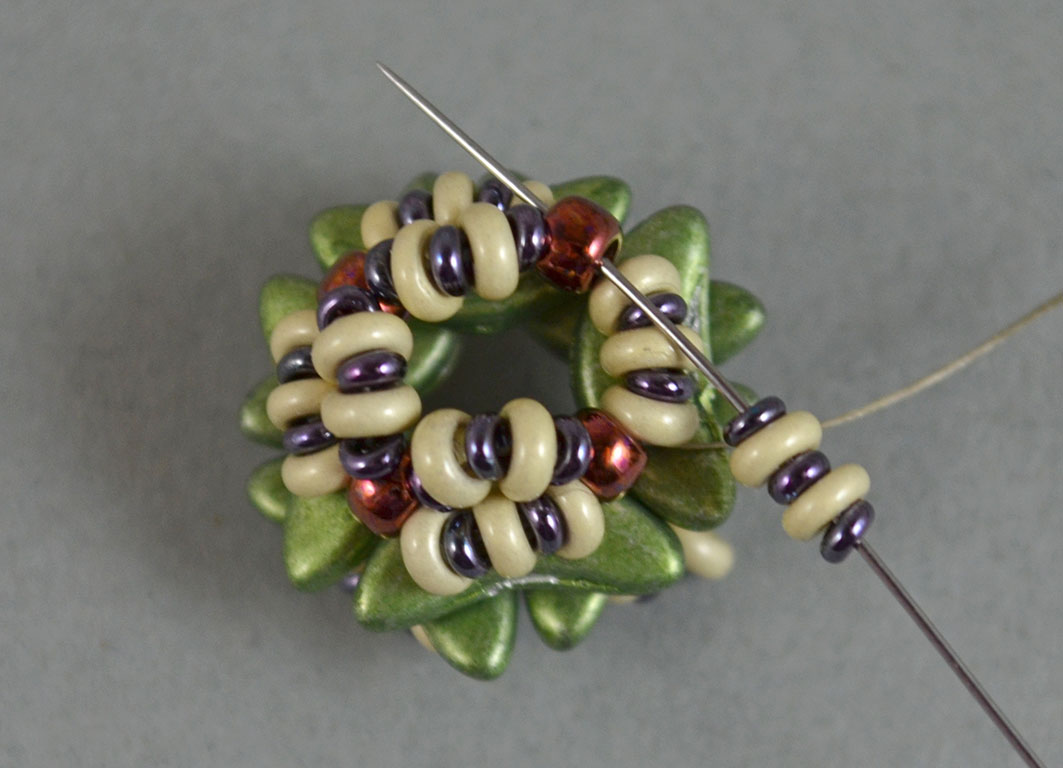
Step 10.
Go one more time through this round following the white thread in the image above and exit in the end from the 8/0 seed bead.

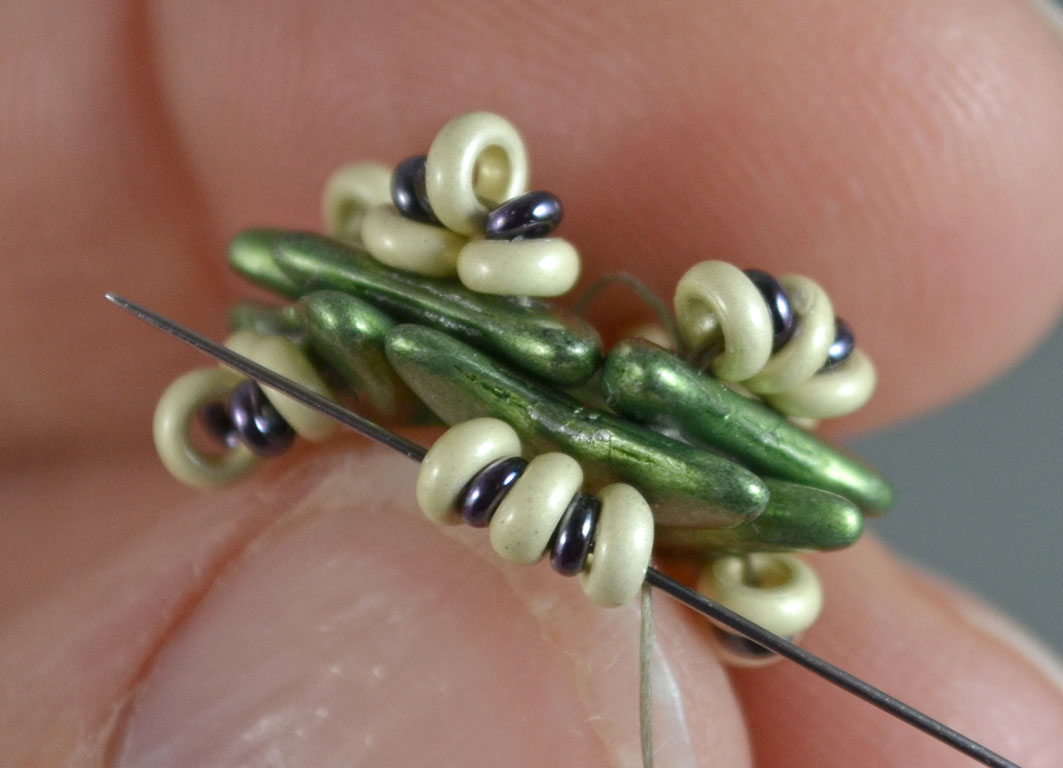
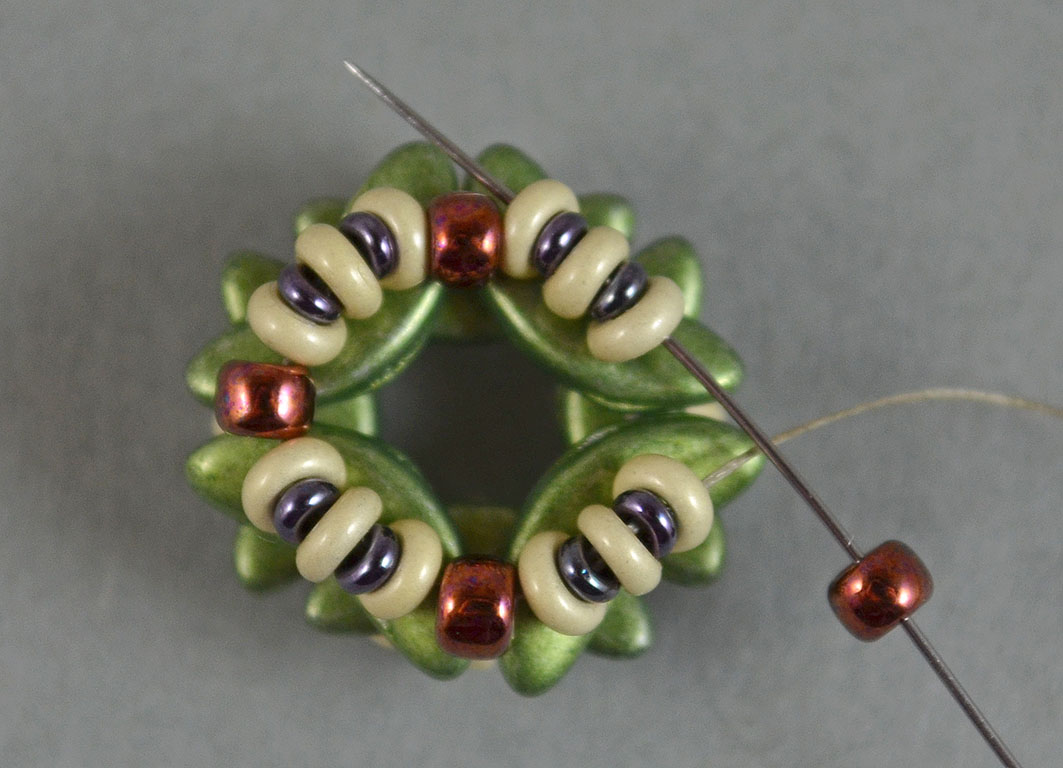
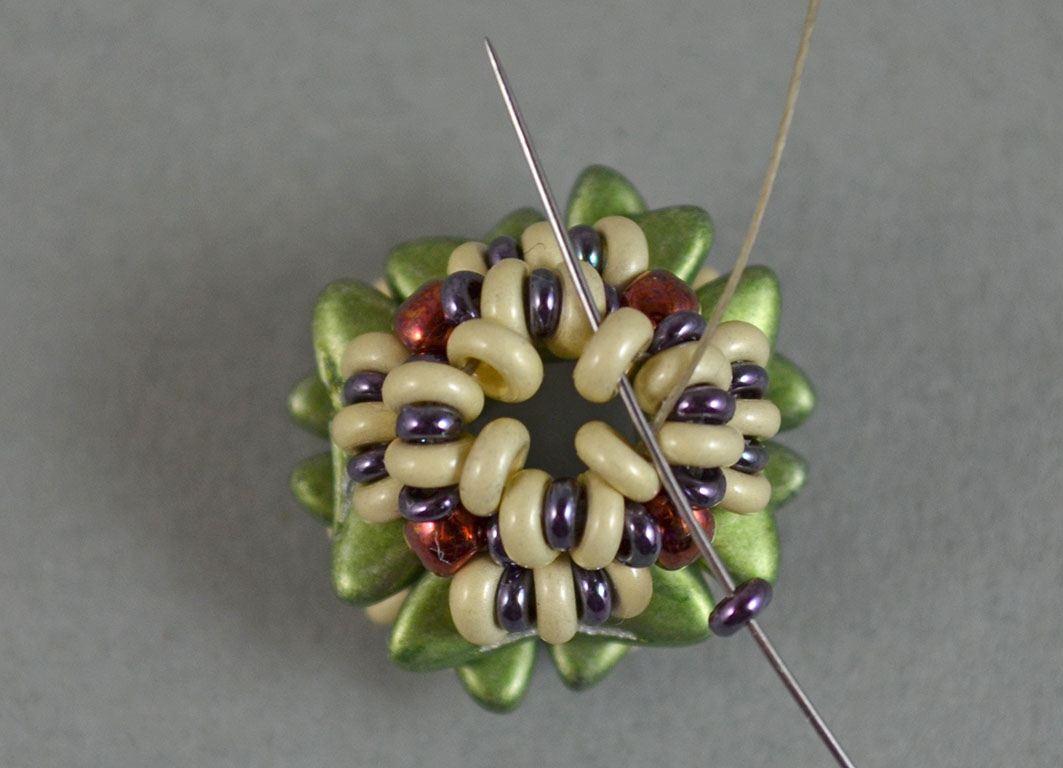
Step 11.
Pick one 11/0 Demi Round bead, one 8/0 Demi Round bead, one 11/0 Demi Round bead, one 8/0 Demi Round bead, one 11/0 Demi Round bead and take the needle through the next 8/0 seed bead added in the previous round.
Repeat adding groups of five Demi Round beads three more times as explained previously in this step.
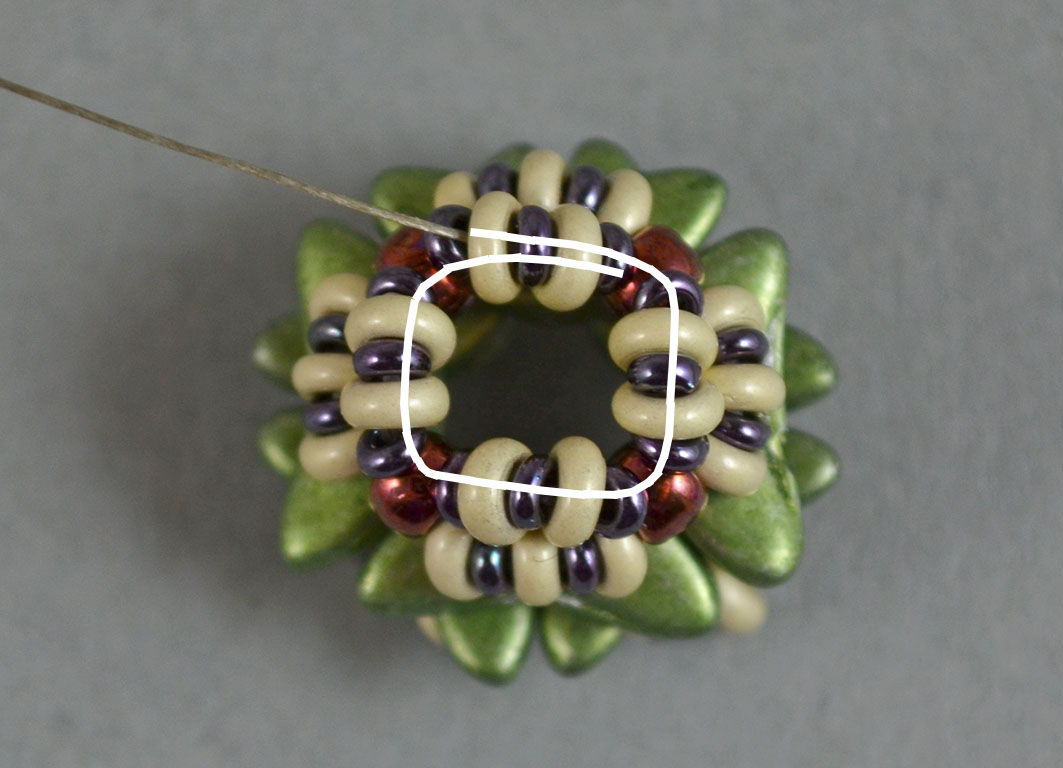
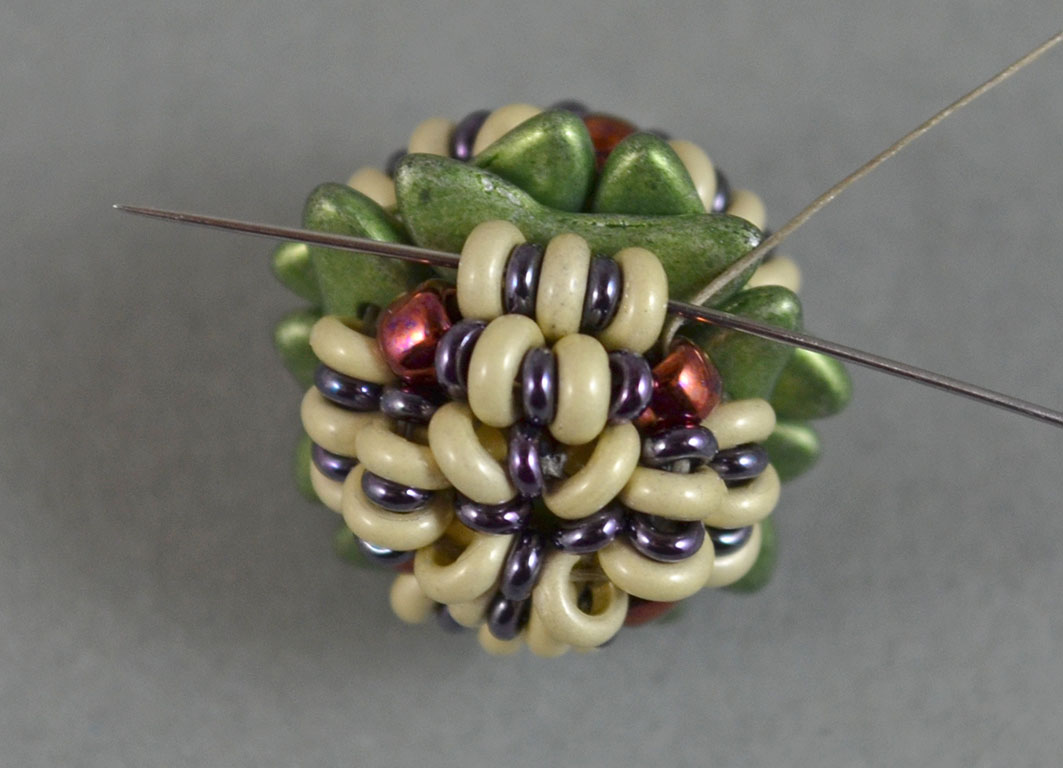
Step 12.
Go one more time with the needle through the last round following the white thread in the image above. Exit from the 8/0 Demi Round bead.
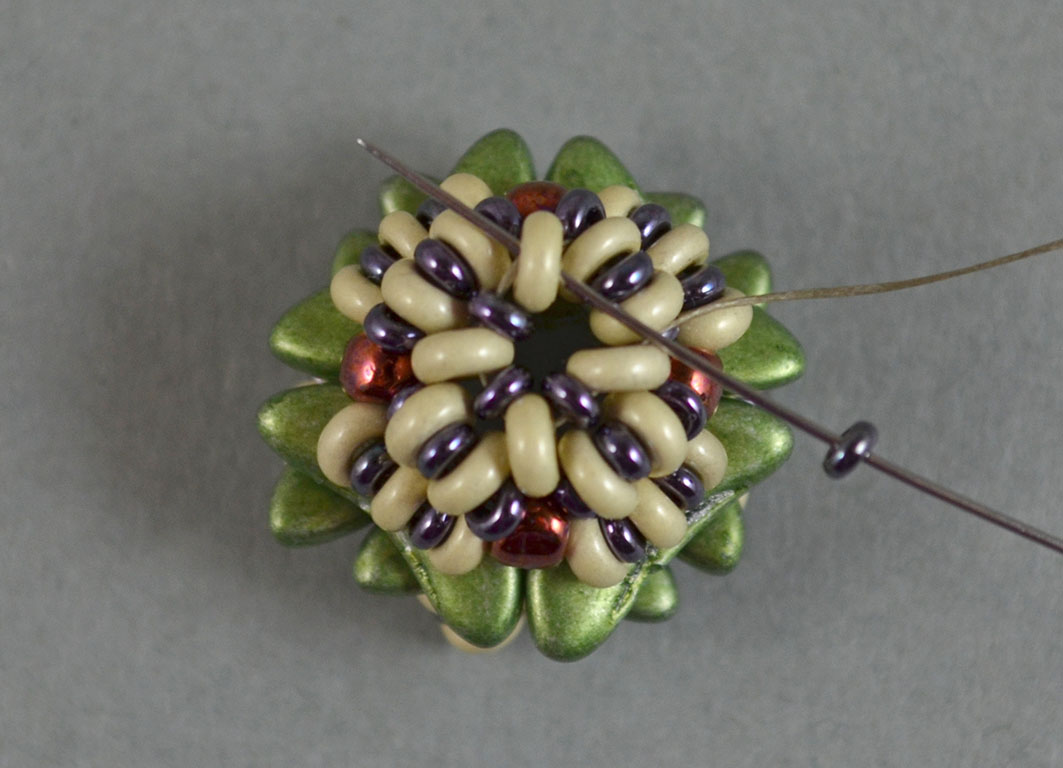
Step 13.
Pick one 8/0 Demi Round bead and go with the needle through the central three Demi Round (8/0, 11/0, 8/0) beads from the next group of five.
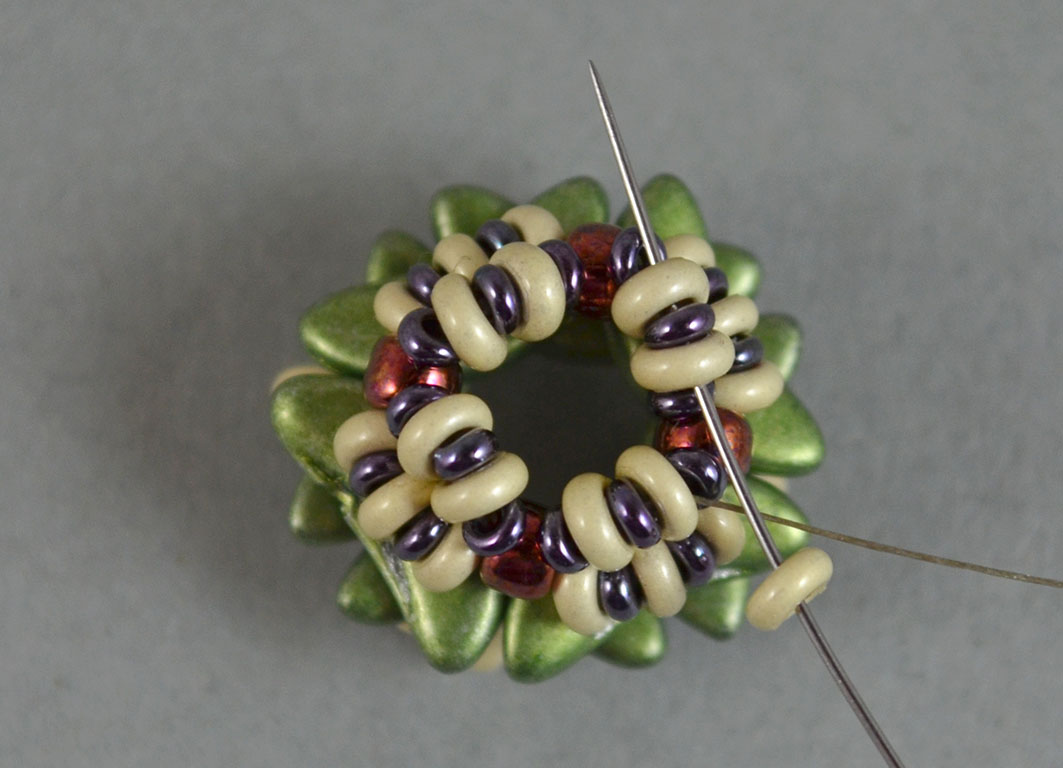
Add other three 8/0 Demi Round beads as explained above. In the end exit from the first added 8/0 Demi Round bead in this step.
Step 14.
Pick one 11/0 Demi Round bead and go with the needle through the next 8/0 Demi Round bead added in the previous step.
Add other three 11/0 Demi Round beads between the 8/0 Demi Rounds to complete the round. In the end exit from the 8/0 Demi Round bead.
Step 15.
Go with the needle through the next four Demi Round beads.
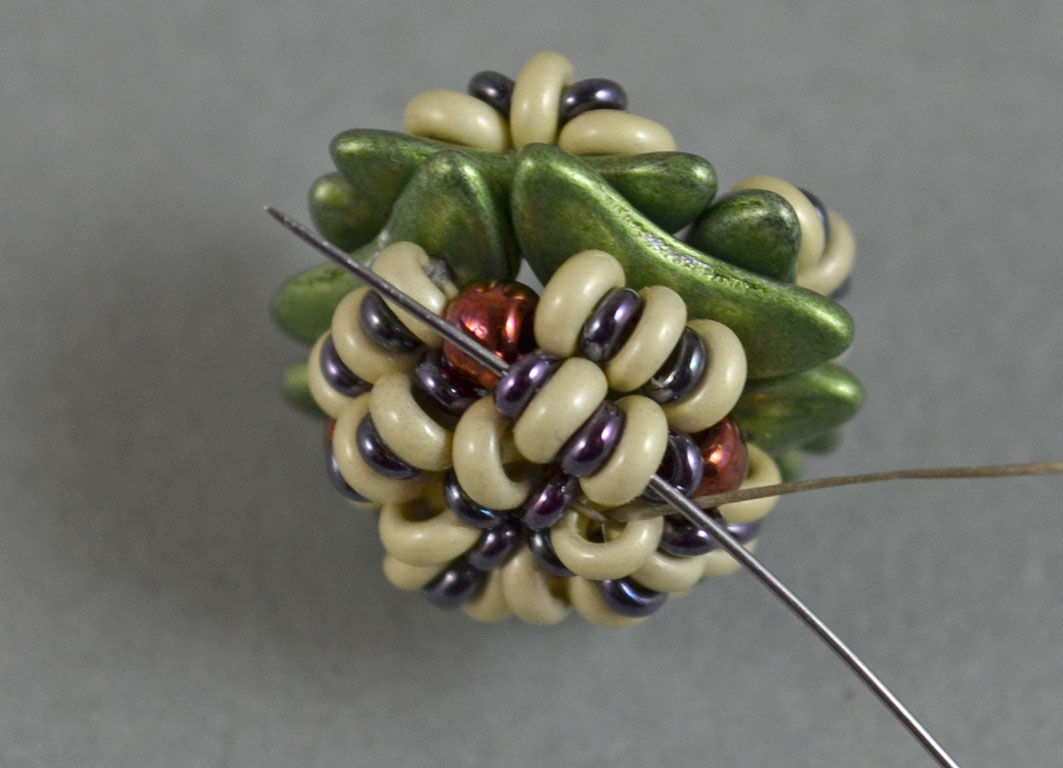
Step 16.
Turn to the right through the next five Demi Round beads.
Take the needle to the back side of the earring through the two Crescent beads.
Go with the needle through the next five Demi Round beads.
Step 17.
Continue beading on the back side of the earring using instructions from Step 9 through Step 15.

Step 18.
Go with the needle through the 8/0 seed bead.

Continue through the next five Demi Round beads.
Step 19. Adding the loop for the ear wire.
Pick six 11/0 Demi Round beads and go through the next five Demi Round beads. Make a full circle around the earring edge through the Demi Round beads and the 8/0 seed beads and one more time through the loop holding the ear wire to strengthen it. Hide the thread into the beadwork and cut the excess. Open the ear wire and take it through this last created loop.
********************
The PDF version of this beading tutorial can be downloaded HERE.
********************
More FREE BEADING PATTERNS are available HERE.